How to Bulk Rename File Extensions in Windows
Learn to efficiently rename multiple file extensions in Windows using File Explorer, Command Prompt, and PowerShell. Includes troubleshooting tips, safety warnings, and best practices for managing your files.
What You'll Need
- rename file extensions Windows
- batch rename files Windows
- change multiple file extensions
- bulk file rename utility
- command line rename extensions
- PowerShell rename file type
- how to change all file extensions
- Windows file extension changer
- how to rename multiple file extensions at once Windows
- change all .jpg to .png in folder Windows
- batch change file types in directory
- rename all files with same extension Windows
Tired of manually changing file extensions one by one? Whether you're organizing photos, converting document types, or cleaning up a cluttered folder, knowing how to bulk rename file extensions in Windows can save you a significant amount of time and effort. This comprehensive guide will walk you through various methods, from simple File Explorer tricks to powerful Command Prompt and PowerShell commands, ensuring you can efficiently manage your files.
Before you begin any bulk renaming operation, it's highly recommended to back up your important files. This way, if anything goes wrong, you can easily restore your original data.
Method 1: Using File Explorer (Basic Batch Rename)
Windows File Explorer offers a simple, built-in way to rename multiple files sequentially. This method is best for when you want to rename a group of files with a common base name and sequential numbers, but it doesn't allow for direct extension changes across different file types.
Step 1: Gather Your Files
Place all the files you wish to rename into a single folder. This makes the selection and renaming process much easier.
Step 2: Select the Files
Open the folder, then select all the files you want to rename. You can do this by dragging your mouse over them, or by pressing `Ctrl + A` to select all files in the folder. Alternatively, hold `Ctrl` and click on individual files to select specific ones.
Step 3: Initiate Rename
Right-click on the *first* selected file and choose "Rename" (or press `F2`). Type the desired new base name for your files. For example, if you type "MyHolidayPhoto", the files will be renamed as "MyHolidayPhoto (1).jpg", "MyHolidayPhoto (2).jpg", and so on, assuming they are .jpg files. The original extensions will be preserved.
Method 2: Using Command Prompt (Advanced Batch Rename)
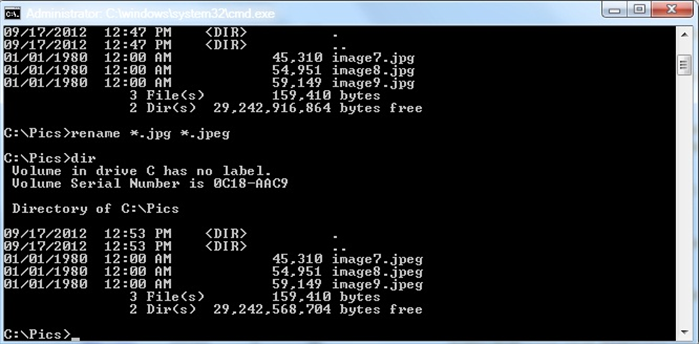
The Command Prompt provides more control for batch renaming, allowing you to change file extensions for multiple files simultaneously using simple commands and wildcards.
Step 1: Open Command Prompt
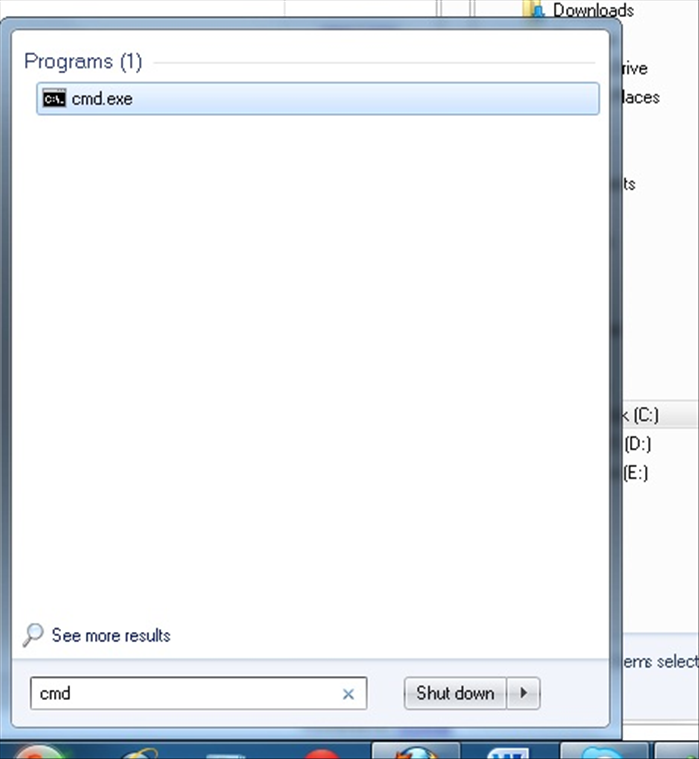
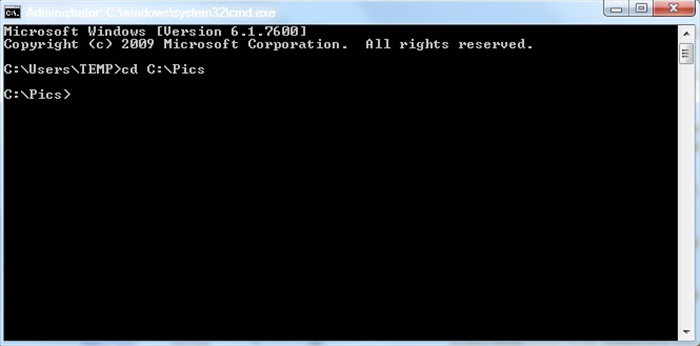
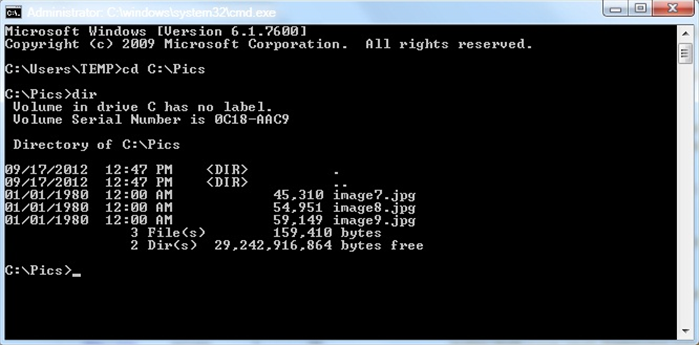
Navigate to the folder containing your files. In the address bar of File Explorer, type `cmd` and press `Enter`. This will open the Command Prompt directly in that directory.
Step 2: Use the `ren` command
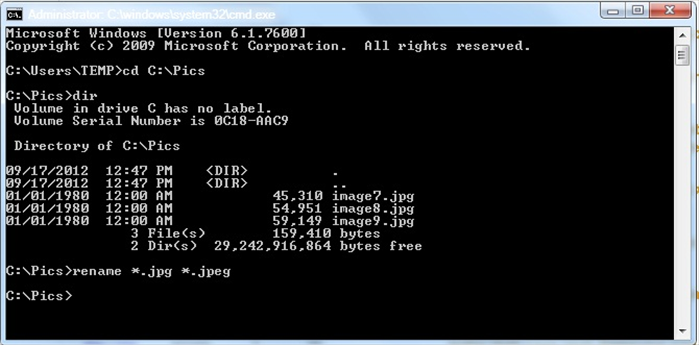
To change all files with one extension to another, use the `ren` (rename) command. The basic syntax is: `ren *.old_extension *.new_extension`
Example: To change all `.txt` files to `.log` files in the current directory:
`ren *.txt *.log`
Example: To change all `.jpeg` files to `.jpg`:
`ren *.jpeg *.jpg`
This command works by taking all files with the specified `old_extension` and renaming their extensions to `new_extension`. The wildcard `*` ensures that all characters before the extension remain the same.
Be very careful with wildcard usage in Command Prompt. Incorrect commands can lead to unintended renaming or even data loss. Always test on a copy of your files first.
Method 3: Using PowerShell (Powerful and Flexible Batch Rename)
PowerShell offers the most advanced and flexible options for bulk renaming, ideal for complex scenarios and scripting. It allows for highly specific renaming patterns and conditions.
Step 1: Open PowerShell
Just like with Command Prompt, navigate to your target folder in File Explorer. In the address bar, type `powershell` and press `Enter`. This will open a PowerShell window in that location.
Step 2: Rename with `Get-ChildItem` and `Rename-Item`
PowerShell uses cmdlets (command-lets) for operations. The `Get-ChildItem` cmdlet retrieves files, and `Rename-Item` renames them. You pipe the output of `Get-ChildItem` to `Rename-Item`.
Basic Syntax:
`Get-ChildItem *.old_extension | Rename-Item -NewName {$_.Name -replace ".old_extension", ".new_extension"}`
Example: To change all `.html` files to `.htm`:
`Get-ChildItem *.html | Rename-Item -NewName {$_.Name -replace ".html", ".htm"}`
Example: Changing multiple specific extensions (e.g., .jpg to .png only if the file name contains "holiday")
`Get-ChildItem *holiday*.jpg | Rename-Item -NewName {$_.Name -replace ".jpg", ".png"}`
This method uses a script block (`{...}`) with the `-replace` operator, giving you granular control over the renaming process.
For more advanced PowerShell renaming, you can use regular expressions with the `-replace` operator to match complex patterns in file names or extensions.
Troubleshooting Tips and Common Errors
Even with careful planning, issues can arise during bulk renaming. Here are some common problems and their solutions:
Files Disappear or Are Not Renamed
If files seem to disappear or are not renamed as expected, double-check your command syntax. A common mistake is using incorrect wildcards or paths. Also, ensure you are in the correct directory in Command Prompt or PowerShell. Always verify the directory before executing commands.
Permission Denied Errors
If you encounter "Access Denied" or "Permission Denied" errors, it usually means you don't have the necessary administrative privileges. Try running Command Prompt or PowerShell as an administrator (right-click the shortcut and select "Run as administrator").
Incorrect Renaming Results
If files are renamed incorrectly, immediately check your command or script. It's possible a wildcard matched more than you intended, or your `-replace` pattern in PowerShell was too broad. Use the backup you created!
Conclusion: Best Practices for File Renaming
Bulk renaming file extensions in Windows can dramatically improve your file management efficiency. By understanding the capabilities of File Explorer, Command Prompt, and PowerShell, you can choose the right tool for any task. Always remember these best practices to ensure a smooth and safe process:
• Always Back Up: Before any large-scale operation, copy your files to a safe location.
• Test on a Small Batch: If you're unsure about a command, test it on a few non-critical files first.
• Verify Directory: Ensure you are executing commands in the correct folder.
• Understand Your Tools: Know the limitations and strengths of File Explorer, Command Prompt, and PowerShell.
• Review Results: After renaming, quickly check a few files to confirm the changes are as intended.
With these methods and tips, you're now equipped to handle bulk file extension renaming like a pro!